A choking infant is one of the most terrifying emergencies a caregiver can face. Every second matters when a small airway is blocked. Knowing exactly what to do — and how to do it correctly — can save a life before emergency services arrive.
Introduction
Choking is a leading cause of injury-related death in children under the age of one. The CDC reports that airway obstruction accounts for a significant portion of unintentional injury fatalities in infants. Small airways, underdeveloped swallowing coordination, and natural curiosity make infants especially vulnerable.
Unlike adults and older children, infants cannot be treated with abdominal thrusts. Their internal organs are fragile and unprotected. A specific combination of back blows and chest thrusts is used instead, and correct positioning is the foundation of making those techniques work.
This article walks through exactly how to position an infant during a choking emergency. It covers technique, sequence, and the critical moments when calling for emergency help becomes the priority. Understanding this skill thoroughly prepares caregivers to respond with speed and confidence.
What Are Back Blows for Infants?
Back blows are firm strikes delivered to the center of an infant’s back between the shoulder blades. They are designed to create a sharp force that dislodges a foreign object from the airway. The technique relies on both positioning and controlled impact to be effective.
The goal of a back blow is to use internal pressure to push a blockage upward and out of the airway. When an infant is positioned correctly — face down with the head lower than the chest — gravity assists the process. Each blow sends a pressure wave through the airway that helps move the obstruction toward the mouth.
Call Us Now
Get the Best CPR Class in Kansas City Today!
Back blows are not the same as patting a baby’s back during burping. The force required is firm and deliberate. Gentle contact will not generate enough pressure to clear a serious airway obstruction.
The American Heart Association and the American Red Cross both recognize back blows combined with chest thrusts as the recommended intervention for infant choking. This technique is taught in infant CPR and BLS courses worldwide. Proper execution begins entirely with how the infant is held.
The Correct Position for Giving Back Blows to an Infant
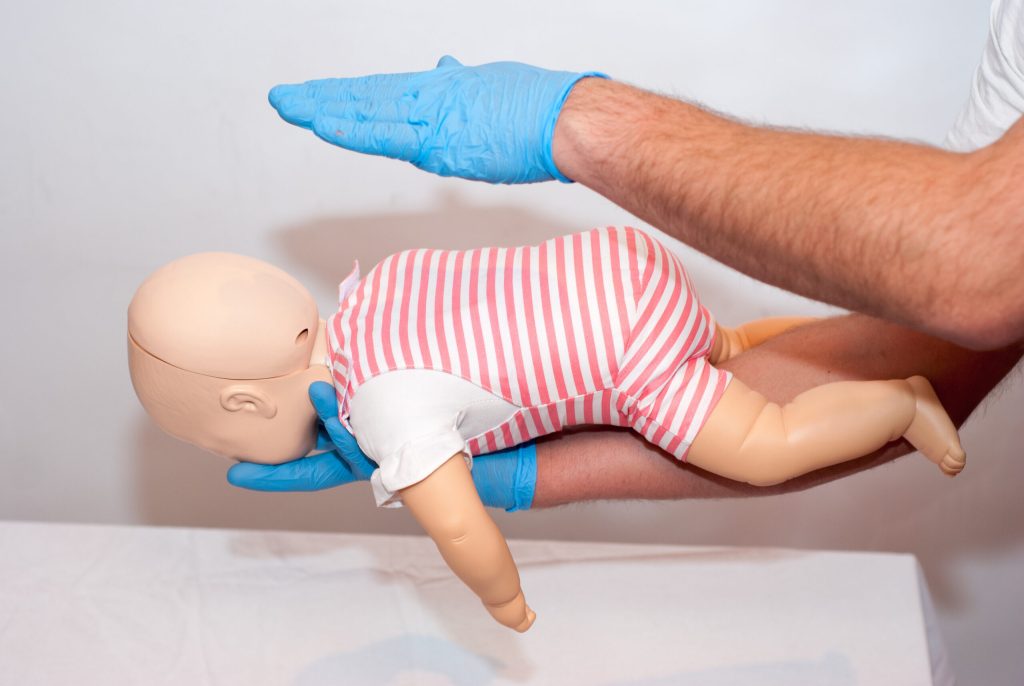
Positioning is the most critical element of effective back blows. An incorrect hold reduces the force of each blow and removes the gravitational advantage needed to clear the airway. Every component of the hold must be executed deliberately.
Follow these steps to achieve correct positioning:
- Sit or kneel — Lower your body to create a stable base before picking up the infant
- Hold the infant face down — Place the baby along your forearm with their chest resting on your arm
- Support the head and jaw — Cradle the infant’s jaw firmly in your hand to keep the head stable; do not cover the mouth or compress the throat
- Keep the head lower than the chest — Angle your forearm downward so the infant’s head is positioned below the level of the torso; gravity will assist the dislodgement
- Use your thigh for support — Rest your forearm on your thigh to provide a firm, stable platform for delivering blows
- Keep the airway open — The head should be in a neutral position, not hyperextended or dropped forward
Once positioned correctly, deliver back blows using the heel of your free hand. The heel of the hand — the firm, fleshy area at the base of the palm — concentrates force effectively. Strike firmly between the shoulder blades in the center of the back.
The infant’s face should be angled slightly downward during each blow. This positioning ensures that any dislodged material moves toward the mouth and not deeper into the airway. Never hold an infant upside down by the ankles to perform back blows, as this position offers no control and risks injury.
How Many Back Blows Do You Give to an Infant?
The standard protocol calls for five back blows delivered in sequence. Each blow should be firm, controlled, and directed toward the center of the upper back. The five-blow sequence is then followed immediately by five chest thrusts.
Each back blow should be:
- Distinct and separate — Deliver one blow at a time with a brief pause between each
- Firm but controlled — Use enough force to create internal pressure without striking recklessly
- Targeted — Aim for the center of the back between the shoulder blades every time
- Delivered with the heel of the hand — The heel concentrates impact; open-palm or fingertip strikes are far less effective
After five back blows, the infant is turned face up along the opposite forearm to receive five chest thrusts. This alternating cycle continues until the object is expelled or the infant loses consciousness. The AHA refers to this as the five-and-five approach.
Do not stop after a single back blow, even if you believe it may have worked. Complete all five blows before checking the mouth or transitioning to chest thrusts. Stopping risks prematurely leaves a partial obstruction in place.
Combining Back Blows with Chest Thrusts
Back blows and chest thrusts work together as a paired intervention. Neither technique alone is as effective as the two used in combination. The alternating sequence creates repeated pressure changes in the airway that progressively work to dislodge the obstruction.
To transition from back blows to chest thrusts correctly:
- Turn the infant face up — Place your free hand on the back of the infant’s head and carefully sandwich the baby between both forearms
- Flip the infant as a unit — Roll the infant face up along your opposite forearm while supporting the head throughout
- Position the infant on your forearm — The infant now lies face up along your arm, with the head still lower than the chest
- Locate the correct chest position — Place two fingers on the center of the chest just below the nipple line on the breastbone
- Deliver five chest thrusts — Push downward approximately 1.5 inches with each thrust, allowing full chest recoil between compressions
After five chest thrusts, look inside the mouth. If an object is visible, remove it carefully with a finger sweep. Never perform a blind finger sweep — inserting a finger without seeing the object can push it deeper into the airway.
If the airway remains blocked, return the infant to the face-down position and repeat the five-and-five cycle. Continue without interruption until the object is removed or the infant becomes unresponsive. If the infant loses consciousness, begin infant CPR immediately and call 911 if not already done.
When to Call 911
Emergency services should be activated as early as possible during an infant choking event. If a second person is present, one person calls 911 while the other performs back blows and chest thrusts. A solo rescuer should attempt the five-and-five technique first and then call 911 if the obstruction is not quickly cleared.
Call 911 immediately if any of the following occur:
- The obstruction does not clear after several cycles — Prolonged choking rapidly depletes oxygen reserves in an infant
- The infant loses consciousness — Unresponsiveness requires immediate transition to infant CPR
- The infant stops breathing or turns blue — Cyanosis around the lips or fingertips signals critical oxygen deprivation
- You are uncertain whether the airway is clear — Even a partial obstruction requires medical evaluation
- The infant appears to recover, but remains distressed — Internal injury or residual obstruction may not be immediately visible
Do not delay calling 911 out of hope that the situation will resolve on its own. Infants deteriorate rapidly during airway emergencies. Emergency dispatchers are trained to guide callers through CPR and choking response in real time while help is on the way.
After any choking event — even one that appears fully resolved — a medical evaluation is recommended. Internal bruising, residual obstruction, or stress to the airway may require professional assessment. Always err on the side of caution with an infant.
Practice Makes Perfect: Why Training Matters
Reading about infant choking response is a valuable first step. Performing the technique correctly under the stress of a real emergency is a different challenge entirely. Hands-on training builds the muscle memory and confidence needed to act without hesitation.
Infant CPR and choking response courses are offered through the American Heart Association, the American Red Cross, and many local hospitals and community organizations. These courses use infant mannequins that simulate realistic resistance and allow learners to practice actual force and positioning. Certification is typically valid for two years.
Key reasons to pursue formal training include:
- Positioning accuracy — Correct hold technique is best learned through physical practice, not description alone
- Force calibration — Knowing how hard to strike requires hands-on repetition with feedback from an instructor
- Stress inoculation — Practicing in a simulated emergency setting prepares the brain to function under real pressure
- Scenario practice — Courses walk through the full five-and-five sequence, including transitions, mouth checks, and escalation to CPR
- Caregiver confidence — Trained caregivers respond faster and more effectively than those relying on memory alone
Caregivers, grandparents, babysitters, daycare workers, and anyone who spends time with infants should be trained. A choking emergency does not wait for the most qualified person in the room. Whoever is present must be ready to act.
Refresher training every one to two years helps maintain skill quality. Guidelines are updated periodically, and technique details can be forgotten without reinforcement. Staying current with training is one of the most responsible commitments a caregiver can make.
FAQs
Q1: How should I position an infant when giving back blows for choking? Place the infant face-down along your forearm with the head lower than the body. This downward angle lets gravity work with you to help move the object toward the mouth rather than deeper into the airway. Rest your forearm on your thigh for stability, and support the infant’s jaw and head with your hand to keep the airway open.
Q2: How many back blows should I give, and what do I do if they don’t work? Deliver five firm blows to the infant’s back between the two shoulder blades. If the infant is still choking after five back blows, move the infant face-up on your other forearm with the head still lower than the chest, then deliver five chest thrusts to the bottom half of the breastbone using two fingers. Repeat this cycle until the obstruction is cleared or emergency help arrives.
Q3: Are there any common mistakes to avoid when giving back blows to an infant? When holding the infant face-down to give back blows, make sure your fingers are on the sides of the head and not blocking the mouth. Each back blow should be separate and distinct from the others.
Conclusion & Call to Action
Knowing the proper infant back blow positioning for choking could be the difference between a frightening moment and a life-threatening tragedy. Back blows are designed to work quickly and safely, using gravity and a gentle yet firm motion to clear the airway without harming the infant’s delicate neck and spine. CPR VAM But reading about it is only the first step — real confidence comes from hands-on practice.
At CPR Kansas City, an American Heart Association training site, we make it easy to get certified in a stress-free, hands-on environment. Whether you’re a parent, grandparent, babysitter, or caregiver, our CPR Certification Classes in Kansas City will walk you through exactly what to do when every second counts. Ready to be prepared for any emergency? Register today for our Heartsaver First Aid Classes in Kansas City and gain the skills to protect the little ones in your life. Don’t wait for an emergency to wish you had trained — sign up now at CPR Kansas City.
